Alright, cake aficionados, listen up! Julian here, and I’m about to drop a truth bomb that will change your St. Patrick’s Day dessert game forever. Forget those dry, crumbly attempts at festive baking. We’re diving headfirst into a Shamrock Shake Cake so ridiculously delicious, so unbelievably minty, that your taste buds will think they’ve struck gold at the end of a rainbow. I’ve been perfecting this recipe for years, and trust me, it’s the ultimate hack for impressing your friends without spending hours slaving away in the kitchen. It’s insanely easy, and the result is pure magic. Get ready for a dessert that’s not just good, it’s legendary.
Why You’ll Love This Shamrock Shake Cake
Let’s be real, who doesn’t love a good Shamrock Shake? This cake captures all that minty, creamy goodness in a show-stopping dessert. But the real reason you’ll obsess over this recipe? It’s the insane flavor payoff for minimal effort. This cake is moist, flavorful, and decorated to impress. It’s seriously the best of both worlds.
- Minty Freshness: This cake delivers a punch of refreshing mint that perfectly mimics the classic Shamrock Shake.
- Moist and Tender Crumb: The creaming method ensures a melt-in-your-mouth texture that’s far from dry.
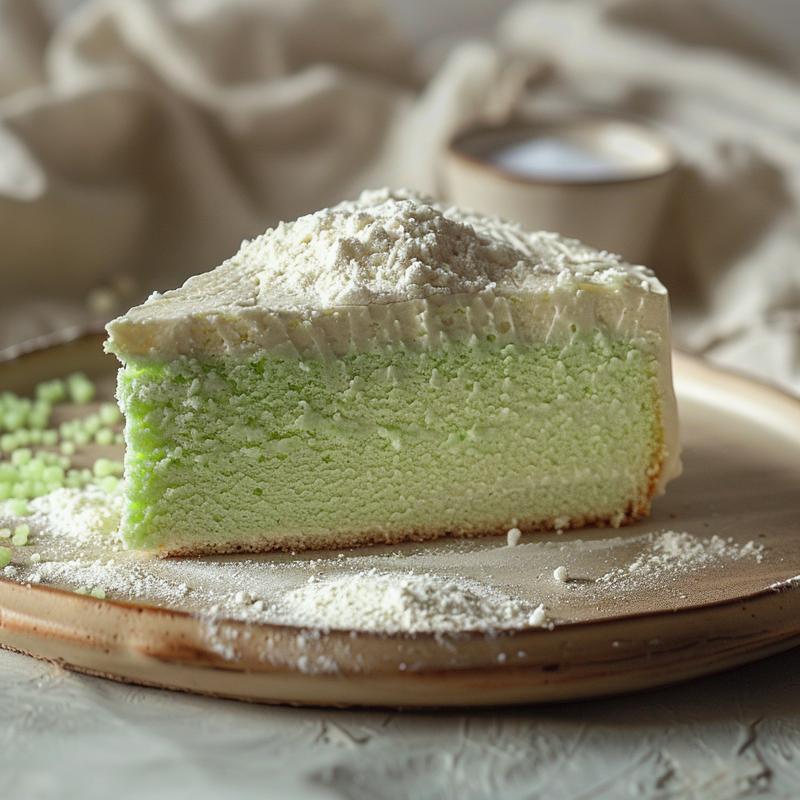
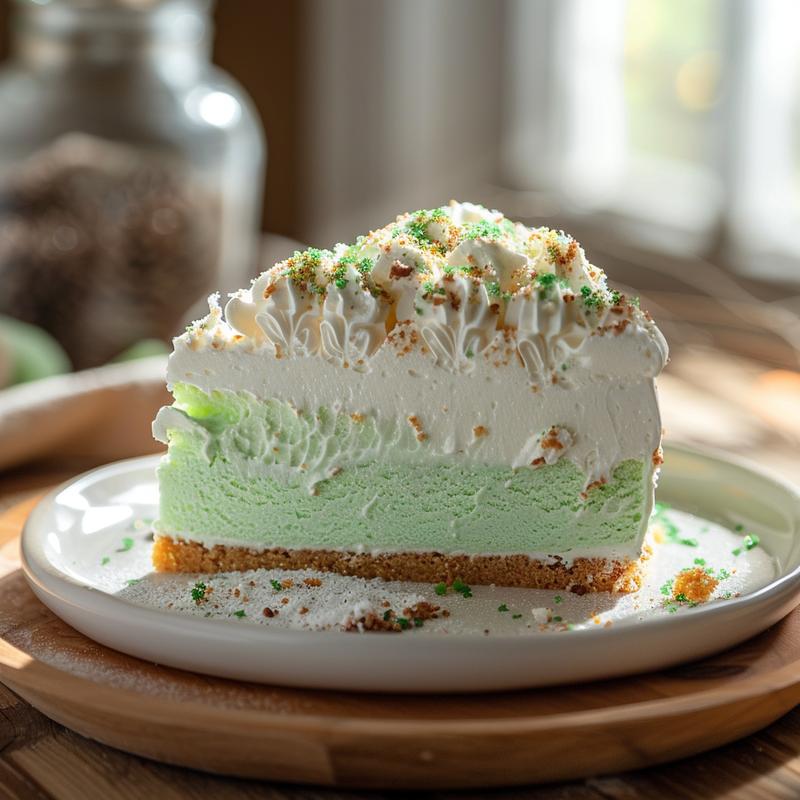
- Stunning Visual Appeal: The ombre frosting and festive decorations make this cake a true showstopper.
- Insanely Easy: Seriously, even a baking newbie can nail this recipe.
- Crowd-Pleasing Flavor: Everyone will be begging for a slice (and the recipe!).
Ingredients: Your Secret Weapon
Okay, let’s talk ingredients. Here’s what you’ll need to whip up this masterpiece. Don’t skimp on quality; it makes a difference! Trust me, I’ve tried it all.
- Flour (240 grams, 2 cups): Provides the structure for the cake.
- Cornstarch (30 grams, 1/4 cup): Creates a tender crumb.
- Baking Powder (4 teaspoons): Helps the cake rise.
- Kosher Salt (1 teaspoon): Enhances the flavors.
- Sugar (350 grams, 1 3/4 cups): Adds sweetness and moisture.
- Egg Whites (5): Creates a light and airy texture.
- Vanilla Extract (1 teaspoon): Enhances the overall flavor profile.
- Milk (240 grams, 1 cup): Adds moisture.
- Butter, cubed (160 grams, 1 1/2 sticks, 6 ounces): Adds richness and flavor to the cake.
- Butter, softened (270 grams, 2 1/2 sticks, 10 ounces): Forms the base of the frosting.
- Table Salt (1/2 teaspoon): Balances the sweetness in the frosting.
- Powdered Sugar (460 grams, 4 cups): Sweetens and thickens the frosting.
- Cream (30-60 grams, 2-4 tablespoons): Adjusts the consistency of the frosting.
- Mint Extract or Oil (1 teaspoon): Provides the signature minty flavor.
- Green Food Coloring: Creates the vibrant green hue.
- White Chocolate: For a delicious drip effect.
- Maraschino Cherries: Adds a touch of classic charm.
- Gold Luster Stars: For extra sparkle and festive flair.
Shamrock Shake Cake: Step-by-Step to Deliciousness
Alright, here’s the breakdown. Follow these steps, and you’ll be basking in cake glory in no time. I’m telling you, it’s easier than it looks.
- Preheat & Prep: Preheat your oven to 350 degrees F (175 degrees C). Grease and flour three 6-inch round cake pans. This is crucial; otherwise, your cake will stick.
- Melt the Butter: Place the cubed butter in a bowl and microwave for 30-45 seconds, until slightly melted and soft. We want it melty, not exploded.
- Combine Dry Ingredients: In the bowl of your stand mixer, combine the flour, cornstarch, baking powder, salt, and sugar. Mix until well combined. If you don’t have a stand mixer, a hand mixer works too.
- Whisk Wet Ingredients: In a separate measuring cup, whisk together the milk, vanilla extract, and egg whites.
- Combine Butter & Flour: With the mixer running, slowly add the melted butter to the flour mixture, a few tablespoons at a time. Let the mixer run for about a minute until the batter is coarse and sandy, and no visible pieces of butter remain. This is the secret to that perfect crumb.
- Add Milk Mixture: With the mixer on low, gradually pour in the milk and egg mixture. Increase the speed to high and beat for 1 minute until the batter is smooth and homogeneous.
- Divide & Bake: Divide the batter evenly among the prepared pans. Bake for 16-20 minutes, or until a toothpick inserted into the center comes out with just a few moist crumbs.
- Cool Completely: Let the cakes cool completely in the pans before frosting. Patience, my friend, patience.
- Cream the Butter: To make the frosting, beat the softened butter for 3 minutes until light, fluffy, and doubled in volume.
- Add Salt & Sugar: Add the salt and powdered sugar to the butter and mix on low speed until combined. Slowly add the cream, one spoonful at a time, mixing after each addition, until the frosting reaches your desired consistency. If you find that it s still too thick, add a little more cream.
- Minty Magic: Add the mint extract to the frosting and mix well.
- Divide & Color: Divide the frosting into two bowls. Add green food coloring to one bowl and mix until you achieve your desired shade of green.
- Stack & Frost: Place one cake layer on a cake stand and top with about 1/2 cup of frosting. Repeat with the remaining layers.
- Ombre Effect: Using only the green frosting, apply a thick layer to the bottom half of the cake. Repeat with the white frosting for the upper half of the cake, saving 1/2 cup of the white frosting for later. Use a large spatula to gently blend and smooth the frostings together, creating a seamless ombre effect.
- Chill: Place the frosted cake in the refrigerator to chill for at least 30 minutes.
- Drip It: Gently melt the white chocolate in the microwave. Pour or pipe the melted white chocolate over the edges of the chilled cake, creating a beautiful drip effect.
- Final Flourishes: Using the reserved white frosting, pipe some poofs on top of the cake using a French tip or star tip. Place a maraschino cherry on top of each poof and sprinkle with edible gold star glitter.
Pro Tips for Shamrock Shake Cake Perfection
These are the little secrets that separate a good cake from a *great* cake. Pay attention!
- Room Temperature is Key: Make sure your butter and eggs are at room temperature for the best emulsion and a smooth batter.
- Don’t Overmix: Overmixing develops gluten, resulting in a tough cake. Mix until just combined.
- Level Your Layers: If your cake layers are uneven, use a serrated knife to level them before frosting.
- Chill Time is Crucial: Chilling the cake before adding the white chocolate drip helps it set properly.
- Quality Extracts Matter: Invest in good quality mint extract for the best flavor.
Common Mistakes to Avoid
We all make mistakes, but let’s try to avoid these common cake-baking blunders. I’ve made ‘em all, so you don’t have to!
- Overbaking: This leads to a dry cake. Use a toothpick to check for doneness.
- Uneven Layers: Use a kitchen scale to ensure each pan has an equal amount of batter.
- Lumpy Frosting: Sift your powdered sugar to avoid lumps in your frosting.
- Not Cooling Completely: Frosting a warm cake is a recipe for disaster. Let it cool completely!
- Ignoring the Recipe: Baking is a science. Follow the recipe closely for the best results.
Shamrock Shake Cake Variations: Remix Your Recipe
Feeling adventurous? Here are a few ways to put your own spin on this already amazing cake. I’m all about experimentation!
- Shamrock Shake Cheesecake: Add a layer of creamy cheesecake filling between the cake layers.
- Irish Cream Poke Cake St. Patrick’s Day: Poke holes in the baked cake and pour in Irish cream liqueur for an extra boozy kick.
- Mint Chocolate Chip: Add mini chocolate chips to the cake batter for a chocolate mint twist.
- St. Patrick’s Ombre Cake: Create a more dramatic ombre effect with different shades of green frosting.
- Irish Cream Poke Cake St. Patrick’s Day: This cake combines the flavors of Irish cream with a moist and tender cake, soaked in a sweet and creamy sauce.
Storing Your Shamrock Shake Cake
Got leftovers? (Highly unlikely, but just in case…) Here’s how to keep your cake fresh and delicious.
- Room Temperature: Store in an airtight container for up to 2 days.
- Refrigerator: Store in an airtight container for up to 5 days.
- Freezer: Wrap individual slices tightly in plastic wrap and foil, then freeze for up to 2 months. Thaw in the refrigerator before serving.
Shamrock Shake Cake FAQ: Your Burning Questions Answered
Got questions? I’ve got answers. Here are some of the most common queries about this recipe.
- Can I use cake flour instead of all-purpose flour? Yes, but reduce the amount by 2 tablespoons per cup.
- Can I use oil instead of butter? Yes, but the cake won’t be as rich and flavorful.
- Can I make this cake gluten-free? Yes, use a gluten-free flour blend and follow the package instructions.
- Can I use a different size pan? Yes, but adjust the baking time accordingly. Keep an eye on the cake if you do.
- Can I make the frosting ahead of time? Yes, store it in the refrigerator for up to 3 days. Let it come to room temperature and re-whip before using.
Serving Suggestions: The Grand Finale
Okay, you’ve baked the cake. Now it’s time to present it like a pro. Here are some serving suggestions to elevate your dessert game.
- A la Mode: Serve with a scoop of vanilla ice cream or Mint Shake.
- Coffee Pairing: Pair with a strong cup of coffee or a creamy latte.
- Festive Drinks: Serve alongside green-themed cocktails or mocktails.
- Garnish Game Strong: Add extra maraschino cherries, gold luster stars, or a dusting of powdered sugar for a finishing touch.
- Presentation Matters: Use a beautiful cake stand to showcase your masterpiece.
So, there you have it! My foolproof Shamrock Shake Cake recipe. Get ready to impress everyone with this deliciously minty, visually stunning creation. I’m Julian, and I’m out. Happy baking, friends! 🥂

Shamrock Shake Cake
Ingredients
Method
- Preheat oven to 350 degrees F and grease and flour 3 6-inch round pans.
- Microwave butter until slightly melted.
- Mix flour, cornstarch, baking powder, salt, and sugar.
- Whisk milk, vanilla extract, and egg whites.
- Add melty butter to flour mixture gradually.
- Stream in milk and egg mixture; beat until smooth.
- Divide into prepared pans.
- Bake for 16-20 minutes.
- Allow to cool completely.
- Beat softened butter until fluffy.
- Add salt and sugar; add cream if needed.
- Add the mint extract.
- Divide batter; add green food coloring to one bowl.
- Place layer on stand; top with frosting.
- Repeat until all layers are stacked.
- Add green frosting to the bottom half.
- Add white frosting to the upper half.
- Blend and smooth the frostings together.
- Chill in the fridge.
- Melt white chocolate; pour over edges.
- Pipe poofs on top with extra white frosting.
- Place a cherry on each poof and add gold stars.
Notes
Loved this recipe? Save it to your favorite Pinterest board so you can easily find it later! ✨