Hello, my dear friends. There’s a certain magic that fills the air as spring arrives, a gentle invitation to awaken our senses and embrace the beauty that surrounds us. Just as the flowers begin to bloom and the birds sing their cheerful melodies, our hearts, too, feel a longing for renewal and joy. What better way to capture this enchanting season than through the art of cake decorating? Today, I want to share with you a simple yet utterly delightful way to create a sun-kissed cake that will brighten up any gathering. It’s a project filled with warmth, creativity, and a touch of homemade love. Get ready to infuse your baking with the spirit of spring!
Imagine presenting a cake that not only tastes divine but also radiates the cheerful essence of a sunny spring day. This isn’t just about baking; it’s about crafting a moment, a memory, a piece of edible art that speaks to the soul. Let’s embark on this sweet journey together, transforming a simple cake into a vibrant celebration of springtime. Let the warmth of the sun inspire us, and let’s create something truly special.
Why You’ll Love This Spring Cake
There are so many reasons why this Springtime Cake Decorating idea is close to my heart. It’s more than just a recipe; it’s an experience. Here’s what makes it so special:
- Simplicity: You don’t need to be a professional baker. This design is achievable for bakers of all levels.
- Joyful Aesthetics: The bright colors and sun-inspired design instantly uplift the mood. It’s like bringing a little piece of sunshine to your table.
- Customizable: Feel free to adapt the flavors and colors to your liking. It’s all about expressing your creativity and personal touch.
- Perfect for Gatherings: Whether it’s a birthday party, a spring picnic, or a simple afternoon tea, this cake is sure to impress your guests.
- Therapeutic: The act of decorating a cake can be incredibly soothing and meditative. It’s a wonderful way to unwind and connect with your inner artist.
This charming lovers cake design is one that you’ll want to make again and again. It truly is a delightful creation!
Ingredients: Your Palette of Spring
Here’s what you’ll need to bring this sun-kissed cake to life:
- Prepared cake (any flavor): Choose your favorite! Vanilla, lemon, or even a chocolate cake would work beautifully.
- Yellow buttercream frosting: This will be the main color for our sunshine theme. Homemade or store-bought, both are fine.
- Orange buttercream frosting: To add depth and warmth, we’ll use a touch of orange.
- White buttercream frosting: For the crumb coat and delicate details.
- Round cake board: To present your masterpiece.
- Piping bags: Essential for creating those beautiful decorations.
- Star piping tip: For the sun’s corona.
- Small round piping tip: For the delicate dots and swirls.
- Yellow fondant (optional, for sun rays): If you want to add an extra touch of dimension.
- Edible glitter (optional): For a shimmering, magical effect.
Each ingredient plays a vital role in crafting this delightful cake. The quality of your buttercream will directly impact how easy it is to pipe decorations, so make sure it’s nice and smooth.
Steps: Painting with Frosting
Now, let’s bring our vision to life! Here’s a step-by-step guide to creating your Springtime Sun-Kissed Cake:
- Prepare Your Canvas: Bake your cake according to your favorite recipe or box mix. Let it cool completely. This is crucial for preventing the frosting from melting.
- Crumb Coat: Level the cake layers if necessary and frost the entire cake with a thin layer of white buttercream (crumb coat). Chill for 30 minutes. This seals in the crumbs and creates a smooth base.
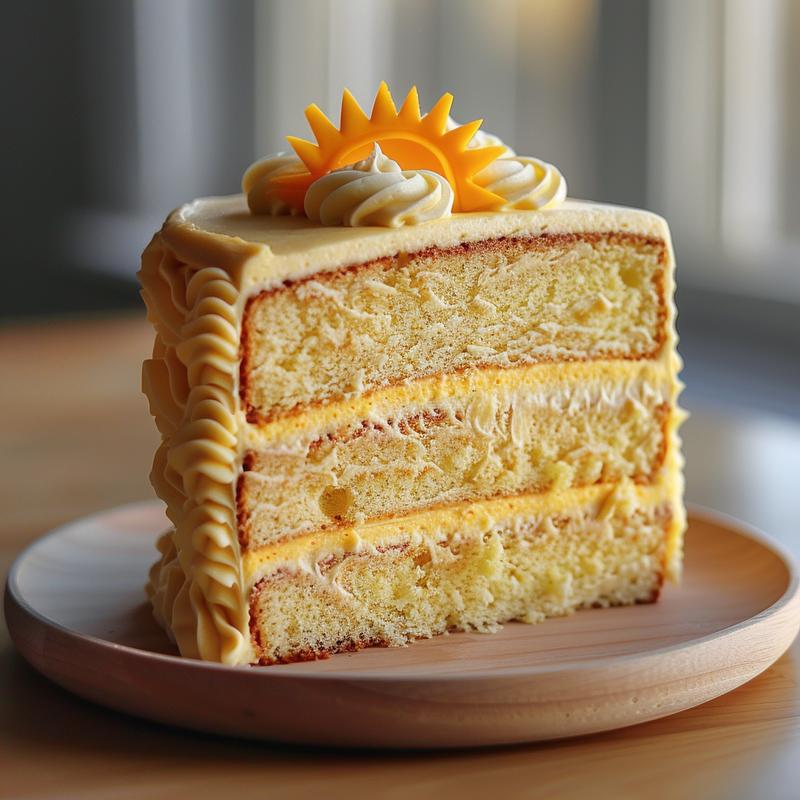
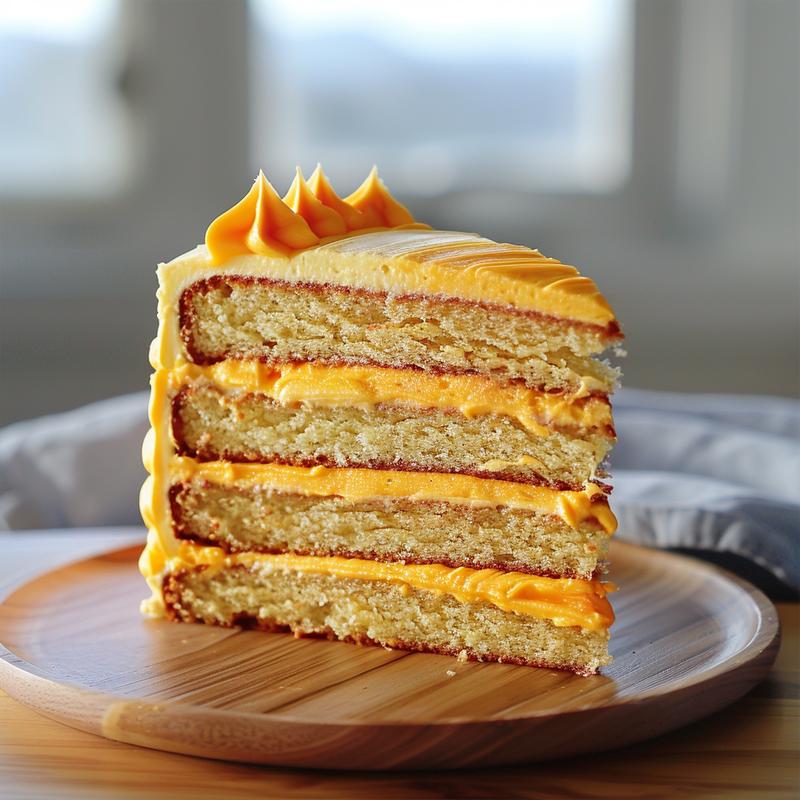
- Sunshine Colors: Frost the top half of the cake with yellow buttercream and the bottom half with orange buttercream. Smooth the frosting as best you can. Don’t worry about perfection; a little texture adds character.
- Sun’s Corona: Using a star piping tip and yellow buttercream, pipe a ring of stars around the top edge of the cake to represent the sun’s corona. This is where the magic begins to happen.
- Delicate Details: With the small round piping tip and white buttercream, pipe small dots or swirls around the base of the cake, where the orange frosting meets the cake board. These small details add a touch of elegance and whimsy.
- Optional Sun Rays: Roll out yellow fondant and cut out sun ray shapes. Attach them to the top of the cake, radiating outwards from the yellow frosting. This adds a wonderful 3D effect.
- Shimmering Effect: Sprinkle edible glitter lightly over the yellow buttercream for a shimmering effect. A little sparkle goes a long way!
- Chill and Serve: Chill the cake for at least 30 minutes before serving. This allows the frosting to set and the flavors to meld together.
Remember, this is your creation, so feel free to adjust these steps to your liking. The most important thing is to enjoy the process and let your creativity shine. This delightful figurine cake will bring a touch of springtime romance to your gathering. The joy and love of baking will shine through!
Pro Tips for a Perfect Cake
Here are a few extra tips to help you achieve cake decorating success:
- Chill Your Cake: A cold cake is much easier to frost and decorate.
- Smooth Buttercream: Make sure your buttercream is smooth and free of air bubbles. You can achieve this by mixing it on low speed for a few minutes.
- Practice Piping: Before decorating the cake, practice your piping techniques on a piece of parchment paper.
- Use a Turntable: A cake turntable makes frosting and decorating much easier and more efficient.
- Patience is Key: Don’t rush the process. Take your time and enjoy each step.
These little tips can make a big difference in the final result. A statue crafted with attention to detail is beautiful, and so is a cake!
Common Mistakes to Avoid
We all make mistakes, especially when we’re learning. Here are a few common pitfalls to avoid:
- Overmixing Buttercream: This can incorporate too much air and make the frosting difficult to work with.
- Frosting a Warm Cake: This will cause the frosting to melt and slide off.
- Using Too Much Food Coloring: This can alter the taste and texture of the buttercream.
- Rushing the Crumb Coat: This is an essential step for a smooth finish.
- Ignoring Temperature: Make sure your ingredients are at the correct temperature before you start baking.
Learning from our mistakes is part of the journey. Don’t be discouraged if things don’t go perfectly the first time. Each attempt is a learning experience.
Variations: Let Your Creativity Bloom
This recipe is just a starting point. Here are a few variations to inspire your creativity:
- Flower Power: Add edible flowers or fondant flowers to the cake for an extra touch of springtime beauty. Consider a daisy flower cake or a spring flower cake.
- Ombre Effect: Create an ombre effect with different shades of yellow and orange buttercream.
- Lemon Zest: Add lemon zest to the buttercream for a burst of citrus flavor.
- Berry Delight: Decorate the cake with fresh berries for a delicious and beautiful garnish.
- Chocolate Drizzle: Drizzle melted chocolate over the cake for a decadent touch.
The possibilities are endless! Feel free to experiment and create your own unique version of this Springtime Sun-Kissed Cake. Consider making a spring themed cake!
Storage: Keeping Your Cake Fresh
Here’s how to store your cake to keep it fresh and delicious:
- Room Temperature: If the cake is frosted with buttercream, it can be stored at room temperature for up to 2 days.
- Refrigerator: For longer storage, keep the cake in the refrigerator for up to 5 days.
- Freezer: You can freeze the cake for up to 2 months. Wrap it tightly in plastic wrap and then in foil. Thaw it in the refrigerator overnight before serving.
Proper storage is essential for maintaining the quality and flavor of your cake. It is best to serve your cake at room temperature for the best flavor.
FAQ: Your Burning Questions Answered
Here are some frequently asked questions about cake decorating:
- Can I use store-bought frosting? Absolutely! Store-bought frosting is a great time-saver.
- Can I make the cake ahead of time? Yes, you can bake the cake a day or two in advance and store it in the refrigerator.
- What if my buttercream is too thick? Add a tablespoon of milk or cream at a time until it reaches the desired consistency.
- What if my buttercream is too thin? Add a tablespoon of powdered sugar at a time until it thickens up.
- Can I use different piping tips? Of course! Experiment with different tips to create various textures and designs.
If you have any other questions, feel free to ask in the comments below. I’m always happy to help!
Serving: Sharing the Sunshine
Finally, the moment we’ve all been waiting for: serving our beautiful Springtime Sun-Kissed Cake! Here are a few ideas:
- Presentation: Place the cake on a beautiful cake stand or platter.
- Garnish: Add a few fresh flowers or berries around the base of the cake for an extra touch of elegance.
- Accompaniments: Serve the cake with a scoop of vanilla ice cream or a dollop of whipped cream.
- Beverages: Pair the cake with a glass of iced tea, lemonade, or sparkling wine.
- Ambiance: Create a cheerful and inviting atmosphere with spring-themed decorations and music.
More than just a dessert, this cake is a symbol of joy, hope, and new beginnings. As you share it with your loved ones, may it bring a touch of sunshine and happiness to their day. This delightful cake is perfect for spring cake designs and spring cake ideas. Spring cake decorating has never been easier! Consider this for Cake Decorating Spring.

Springtime Cake Decorating Ideas: Brighten Up Your Gathering with This Adorable Sun-Kiss
Ingredients
Method
- Prepare your cake according to your favorite recipe or box mix. Let it cool completely.
- Level the cake layers if necessary and frost the entire cake with a thin layer of white buttercream (crumb coat). Chill for 30 minutes.
- Frost the top half of the cake with yellow buttercream and the bottom half with orange buttercream. Smooth the frosting as best you can.
- Using a star piping tip and yellow buttercream, pipe a ring of stars around the top edge of the cake to represent the sun's corona.
- With the small round piping tip and white buttercream, pipe small dots or swirls around the base of the cake, where the orange frosting meets the cake board.
- Optional: Roll out yellow fondant and cut out sun ray shapes. Attach them to the top of the cake, radiating outwards from the yellow frosting.
- Optional: Sprinkle edible glitter lightly over the yellow buttercream for a shimmering effect.
- Chill the cake for at least 30 minutes before serving.
Notes
Loved this recipe? Save it to your favorite Pinterest board so you can easily find it later! ✨