Alright, party people, gather ’round! Julian here, your resident food-hack guru, ready to drop some serious fun on your snack game. We’re diving headfirst into the wonderfully wacky world of Dr. Seuss with these utterly adorable Cat in the Hat Fruit Skewers. Trust me, these aren’t just for kids; they’re a guaranteed crowd-pleaser for anyone who appreciates a touch of whimsy and a whole lot of deliciousness. And the best part? They’re insanely easy to make. Seriously, if you can slice a banana, you’re already halfway there. Let’s get skewering!
Why You’ll Love This
Okay, let’s cut to the chase. Why should you even bother with these delightful little skewers? Because they’re the ultimate secret weapon for any parent, party host, or anyone who wants to inject a little fun into their day. It’s about creating something memorable with minimal effort. You want something that screams ‘I’m fun!’ but whispers ‘I barely lifted a finger!’ Well, my friends, you’ve found it.
- Insanely Easy: Seriously, if you can slice a banana (and I believe in you!), you can make these.
- Healthy-ish: Okay, it’s still a treat, but it’s packed with fruit! Way better than sugary snacks.
- Crowd-Pleaser: Kids adore them, adults secretly adore them. Everyone wins.
- Photo-Worthy: These skewers are practically begging to be Instagrammed. Get ready for the likes!
- Customizable: Want to switch up the fruit? Go for it! The red and white theme is the star, but feel free to adjust the supporting cast.
Ingredients
Here’s the super short shopping list. Keep in mind, it’s all about fresh and simple ingredients that pack a visual punch. We’re not talking about complicated stuff here. This is supposed to be fun, remember?
- 10 large strawberries: Look for ripe, juicy ones. The bigger, the better for those vibrant red stripes.
- 2 just-ripe bananas: Not too mushy, not too green. You want them firm enough to hold their shape on the skewer.
- 6 wooden skewers or lollipop sticks: I prefer the shorter lollipop sticks for little hands, but regular skewers work just fine.
- Optional: Lemon juice: This is my secret weapon for keeping the bananas from browning. A little spritz goes a long way.
Step-by-Step: Crafting Your Cat in the Hat Skewers
Alright, let’s get down to business. Follow these ridiculously simple steps, and you’ll have a platter of whimsical skewers in no time. We’re talking minutes, people!
Step 1: Prep Your “Stripes”
Wash your strawberries and pat them completely dry with a clean kitchen towel or paper towels. Grab a sharp paring knife. Here’s the key move: we’re not slicing from top to bottom. We’re slicing horizontally, right through the middle of the berry. You want to create two flat, round discs from each strawberry—these are the iconic red bands of the hat. If your strawberries have a very pointed tip, you can slice off a tiny bit from the bottom (non-stem end) to help it sit flat. Remember, presentation is key! We want those stripes looking sharp.
Step 2: Slice the Bananas
Peel your bananas and lay them on your cutting board. Using the same knife, slice them into rounds about ½-inch thick. Why ½-inch? Thinner slices might break, and thicker slices can make the skewer wobbly. This is the Goldilocks zone for perfect stacking. If you’re using the lemon juice, now’s the time! Put your banana slices in a shallow bowl, give them a very light drizzle or spritz of juice, and toss them gently with your fingers to coat. A little goes a long way! This will prevent browning and keep your skewers looking fresh for longer. Don’t skip this step if you’re prepping ahead!
Step 3: The Grand Skewering!
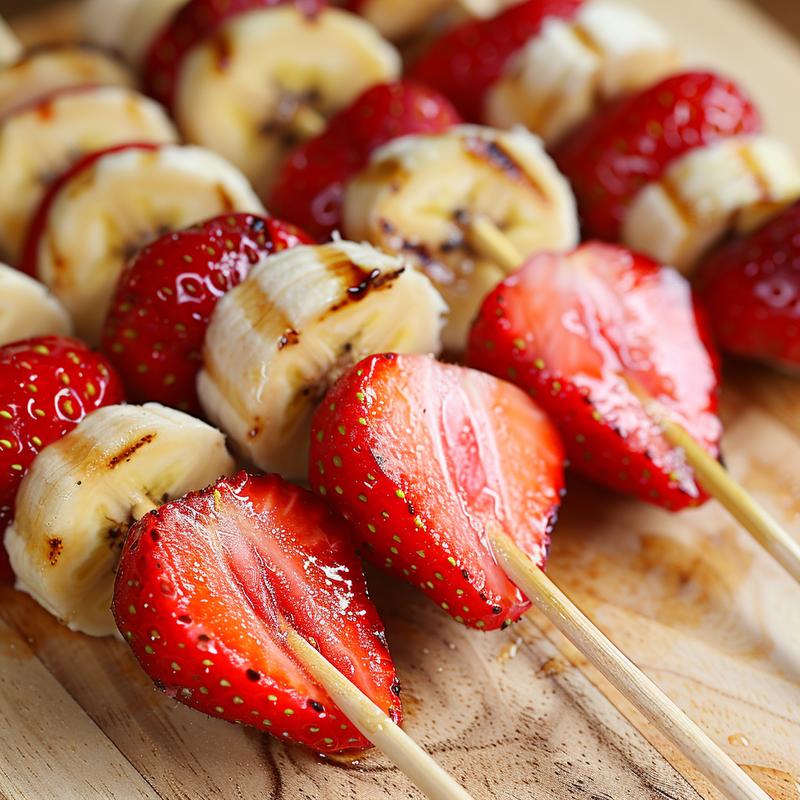
Lay out your skewers. We’re going to build from the bottom up, just like the Cat balancing his cake! First, slide on a strawberry half, cut-side down. This is the wide brim of the hat, our solid foundation. Next, add a banana slice. Then another strawberry half. Then another banana. See the pattern? Red, white, red, white. My secret for a tall, proud hat: Aim for 3-4 banana slices and 3-4 strawberry halves per skewer, ending with a final strawberry half at the very top. Gently press the pieces together as you go so there are no big gaps, but don’t smash them. You want a tight, tidy stack. This is where the magic happens, so take your time and enjoy the process!
Step 4: Serve & Celebrate!
You can serve these whimsical creations immediately on a fun platter. If you need to prep ahead, place them gently in a single layer on a plate or baking sheet, cover loosely with plastic wrap, and refrigerate for up to 2 hours. The lemon juice will work its magic, keeping everything picture-perfect until showtime. Serve with a flourish, and prepare for the applause!
Pro Tips for Skewer Perfection
Okay, you’ve got the basics down. But I wouldn’t be your food-hack bestie if I didn’t arm you with a few extra tricks. These pro tips will take your skewers from cute to seriously impressive.
- Strawberry Selection: Look for strawberries that are uniform in size and shape. This will make your stripes look neater and more consistent.
- Banana Firmness: Slightly underripe bananas are your friend. They hold their shape better and won’t get mushy.
- Lemon Juice is Your BFF: Seriously, don’t skip the lemon juice! It’s the ultimate banana-browning preventer.
- Skewering Technique: Gently twist the fruit as you slide it onto the skewer. This helps to prevent splitting and ensures a secure fit.
- Presentation Matters: Arrange the skewers on a platter in a visually appealing way. Think about color and height to create a dynamic display.
Common Mistakes (and How to Avoid Them)
Even with a foolproof recipe, things can sometimes go awry. Here’s a heads-up on common mistakes and how to dodge them like a pro.
- Mushy Bananas: Using overripe bananas is a recipe for disaster. They’ll fall apart on the skewer and create a sticky mess. Choose firm, slightly underripe bananas instead.
- Browning Bananas: Forgetting the lemon juice is a cardinal sin! Those bananas will turn brown faster than you can say “Cat in the Hat.”
- Soggy Strawberries: Not patting the strawberries dry can lead to soggy skewers. Make sure they’re completely dry before slicing.
- Overcrowding the Skewer: Trying to cram too much fruit onto one skewer will make it unstable and prone to toppling. Less is more!
- Uneven Slices: Inconsistent slicing will result in wonky-looking stripes. Take your time and aim for uniform slices.
Variations: Remix Your Skewers!
Feeling adventurous? Want to put your own spin on these whimsical skewers? Go for it! Here are a few ideas to get your creative juices flowing.
- Berry Bonanza: Swap out the strawberries for raspberries, cranberries, or even red grapes.
- Tropical Twist: Replace the bananas with pineapple chunks or kiwi slices for a taste of the tropics.
- Chocolate Drizzle: Drizzle melted dark chocolate over the finished skewers for an extra-decadent treat.
- Sprinkle Magic: Roll the banana slices in colorful sprinkles before skewering for a festive touch.
- Yogurt Dip: Serve the skewers with a side of vanilla yogurt for dipping.
Storage Secrets
Okay, let’s talk storage. Ideally, these skewers are best served immediately. But, life happens. Here’s how to keep them looking their best if you need to prep ahead.
- Refrigeration: Store the skewers in a single layer on a plate or baking sheet, covered loosely with plastic wrap, for up to 2 hours. The lemon juice will help to prevent browning.
- Freezing: I wouldn’t recommend freezing these skewers. The fruit will become mushy and lose its texture.
- Pro Tip: If you’re making these for a party, assemble them as close to serving time as possible for the best results.
Frequently Asked Questions (FAQ)
Got questions? I’ve got answers! Here are some of the most common questions about these Cat in the Hat Fruit Skewers.
- Can I make these ahead of time? Yes, but I recommend assembling them no more than 2 hours before serving to prevent browning.
- Can I use other fruits? Absolutely! Get creative and use your favorite red and white fruits.
- Are these skewers safe for young children? Yes, but always supervise young children when eating skewers to prevent choking.
- Can I use metal skewers? You can, but wooden skewers are generally safer for kids and easier to handle.
- How do I prevent the fruit from slipping off the skewers? Make sure to gently twist the fruit as you slide it onto the skewer for a secure fit.
Serving Suggestions: Beyond the Party Platter
Alright, you’ve got your skewers. Now what? They’re amazing on their own, but here are a few fun ways to elevate your serving game.
- Dr. Seuss Party: Obviously! These are a must-have for any Dr. Seuss themed celebration.
- Healthy Snack: Pack them in lunchboxes for a fun and nutritious snack.
- Dessert Platter: Add them to a dessert platter alongside other sweet treats for a pop of color and whimsy.
- Breakfast Skewers: Serve them alongside yogurt and granola for a fun and healthy breakfast.
- Garnish: Use them to garnish a smoothie or milkshake for an extra-special touch.
So there you have it! The ultimate guide to making whimsical Cat in the Hat Fruit Skewers. It’s about being creative, it’s about having fun, and it’s about impressing your friends and family with minimal effort. Now go forth and skewer! You’ve got this! And remember, don’t just settle for ordinary, embrace the extraordinary with these delightful treats. Let’s make something amazing, together!


Cat in the Hat Fruit Skewers
Ingredients
Method
- Step 1: Prep Your “Stripes” - Wash strawberries and slice horizontally into discs.
- Step 2: Slice the Bananas - Peel and slice bananas into ½-inch thick rounds. Optionally, toss with lemon juice.
- Step 3: The Grand Skewering! - Skewer strawberry half, banana slice, strawberry half, banana, repeating pattern. Aim for 3-4 slices of each, ending with strawberry.
- Step 4: Serve & Celebrate! - Serve immediately or refrigerate for up to 2 hours.
Notes
Loved this recipe? Save it to your favorite Pinterest board so you can easily find it later! ✨