Cute Easter Chick Cupcakes with Yellow Buttercream: A Spring Baking Showstopper
Alright, cupcake conspirators, gather ’round! Julian here, your resident shortcut savant, and I’m about to let you in on the ultimate Easter baking hack: Cute Easter Chick Cupcakes with Yellow Buttercream. Forget spending hours slaving over complicated desserts. This recipe is insanely easy, totally adorable, and guaranteed to impress, even if you’re, ahem, culinarily challenged. We’re talking maximum impact, minimum effort. Get ready to wow everyone with these delightful spring treats!
This recipe is the secret weapon you need to conquer Easter brunch or any spring celebration. It’s foolproof, fun for all ages, and the end result? Absolutely Instagrammable. Trust me, you’ll be fielding compliments left and right. Let’s dive in!Why You’ll Love These Cute Chick Cupcakes
Seriously, what’s not to love? These aren’t just any cupcakes; they’re mini masterpieces of adorableness. But beyond their looks, they’re incredibly delicious and simple to make. Here’s the lowdown:
- Insanely Easy: Seriously, if I can do it, anyone can. We’re talking basic frosting skills and a few clever decorating tricks.
- Crowd-Pleasing: Who can resist a cute chick cupcake? These are a guaranteed hit with kids and adults alike.
- Customizable: Want to add your own flair? Go for it! We’ll talk about variations later, but the possibilities are endless.
- Perfect for Spring: The bright yellow buttercream and cheerful chick design scream springtime.
- Make Ahead Friendly: Need to prep in advance? No problem! These cupcakes can be made a day in advance, making your life easier.
Ingredients: Your Arsenal of Deliciousness
Here’s what you’ll need to assemble your chick cupcake army. Don’t skimp on quality – it makes all the difference!
- 12 Vanilla Cupcakes (store-bought or homemade): I won’t judge if you grab these from the bakery. The vanilla batter is really the perfect base.
- 1 cup (2 sticks) unsalted butter, softened: Make sure it’s *actually* softened, not melted. Room temperature is key for smooth buttercream.
- 3 cups powdered sugar: This is what gives the frosting its sweetness and structure.
- 2-3 tablespoons milk: Adds moisture and helps achieve the perfect consistency.
- 1 teaspoon vanilla extract: Because vanilla makes everything better.
- Yellow gel food coloring: Gel is the way to go for vibrant color without adding too much liquid.
- Yellow candy melts or chocolate: For the wings (optional, but super cute!).
- Orange candy melts or chocolate: These will become the adorable chick beaks.
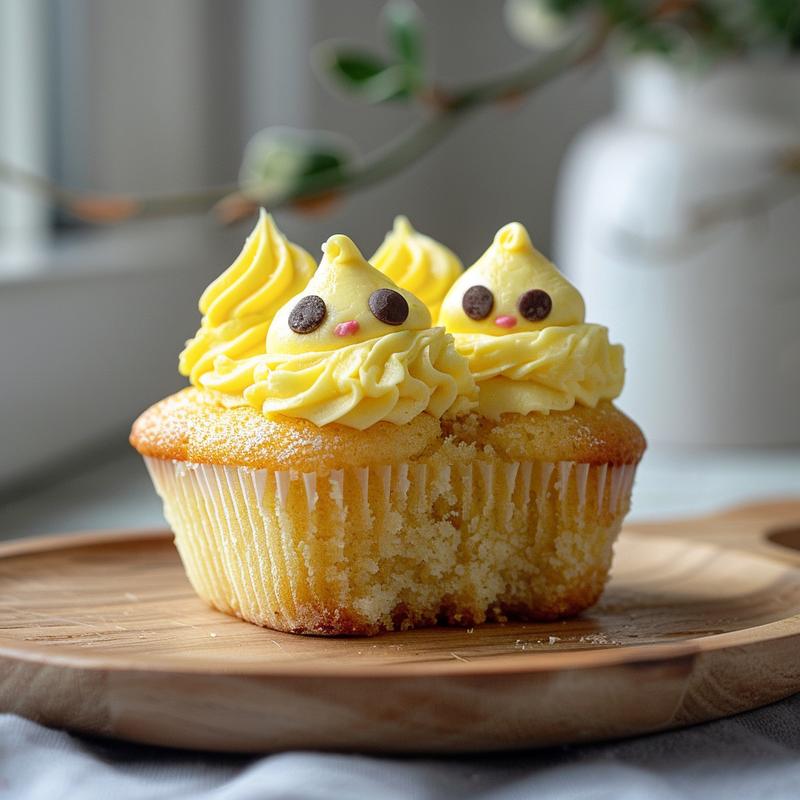
- Mini chocolate chips: The eyes have it!
- Sprinkles (optional): Because sprinkles make everything more fun.
Step-by-Step: From Cupcake to Chick
Alright, let’s get down to business. Follow these steps, and you’ll have a flock of adorable chick cupcakes in no time. This recipe is so simple.
- Prepare the Buttercream: In a large bowl, beat the softened butter until smooth and creamy. Gradually add the powdered sugar, one cup at a time, beating well after each addition. This ensures a smooth frosting.
- Add the milk and vanilla extract: Beat until the buttercream is light and fluffy. If needed, add more milk to achieve desired consistency. The frosting should be easy to spread.
- Tint the Buttercream: Add yellow gel food coloring, a little at a time, until you achieve the desired shade of yellow. Mix well. I love a really bright, sunny yellow!
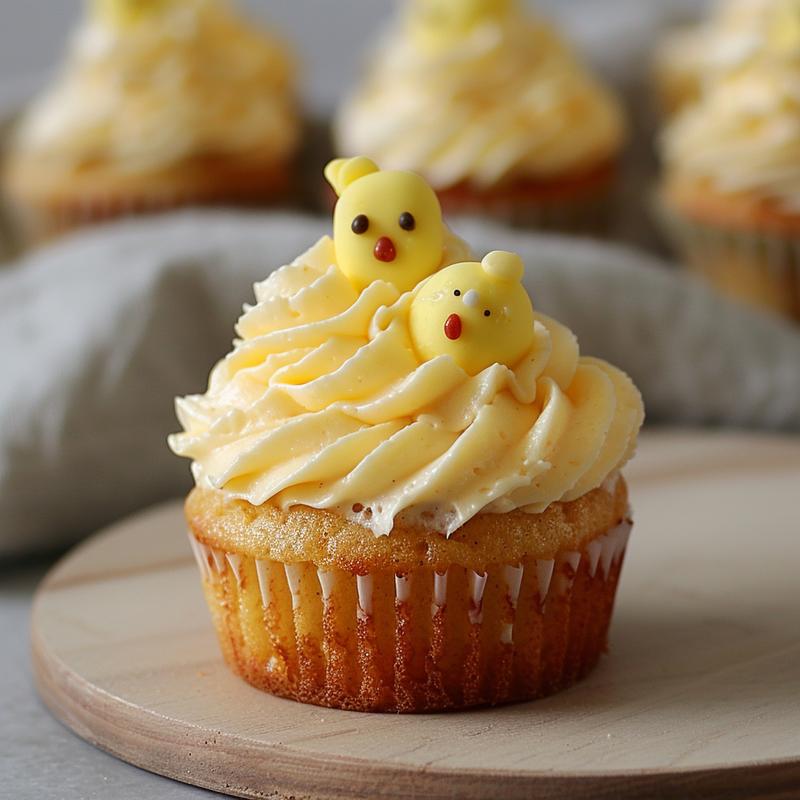
- Frost the Cupcakes: Frost each cupcake with the yellow buttercream. You can use a piping bag or a knife. I prefer a piping bag for a more professional look, but a knife works just fine. Make sure the frosting is a smooth, even layer.
- Make the Chick Beaks: Melt the orange candy melts according to package directions. Transfer the melted chocolate to a small piping bag or a zip-top bag with a tiny corner snipped off. Pipe small triangles onto parchment paper and let them set completely. These will be the beaks.
- Make the Chick Wings (Optional): Melt the yellow candy melts according to package directions. Pipe small wing shapes onto parchment paper and let them set completely. These are an extra touch that really makes the cupcakes special.
- Decorate the Cupcakes: Place two mini chocolate chips on each cupcake to create the eyes. Gently press an orange candy melt beak onto each cupcake, just below the eyes.
- Add the Wings (Optional): If you made wings, gently press them onto the sides of the chick.
- Add Sprinkles (Optional): Sprinkle the cupcakes with sprinkles, if desired.
- Serve and Enjoy: Refrigerate the cupcakes for 15-20 minutes to allow the buttercream to set before serving.
Pro Tips for Cupcake Perfection
Want to take your chick cupcakes to the next level? Here are a few insider secrets:
- Soft Butter is Key: Seriously, don’t skip this step. It’s essential for a smooth, creamy buttercream.
- Don’t Overmix the Buttercream: Overmixing can incorporate too much air, making the frosting unstable.
- Use Gel Food Coloring: It provides a more vibrant color without thinning the frosting.
- Chill the Cupcakes: This helps the buttercream set and makes them easier to handle.
- Practice Piping: If you’re using a piping bag, practice your technique on a piece of parchment paper first.
Common Mistakes to Avoid
Even the best bakers make mistakes. Here’s what to watch out for:
- Using Cold Butter: This will result in lumpy buttercream.
- Overmixing the Buttercream: This can make it too airy and unstable.
- Adding Too Much Liquid: This can make the frosting too thin. Add milk a tablespoon at a time.
- Melting the Candy Melts Incorrectly: Follow the package directions carefully to avoid burning or seizing.
- Forgetting to Chill the Cupcakes: This can make them messy and difficult to handle.
Variations: Unleash Your Inner Artist
Want to put your own spin on these chick cupcakes? Here are a few ideas:
- Different Flavors: Use chocolate, lemon, or even carrot cupcakes instead of vanilla.
- Colored Sprinkles: Use different colors of sprinkles to add a festive touch.
- Edible Glitter: Add a sprinkle of edible glitter for extra sparkle.
- Different Beak Shapes: Experiment with different shapes for the beaks. Try making them slightly curved or pointed.
- Add Feet: Use small pieces of orange candy melts to create feet for the chicks.
Storage: Keeping Your Chicks Fresh
To keep these cupcakes fresh and delicious, store them in an airtight container at room temperature for up to two days. For longer storage, refrigerate them for up to a week. Let them come to room temperature before serving for the best flavor and texture. These cupcakes are best enjoyed within a day in order to maintain their ideal freshness.
FAQ: Your Burning Cupcake Questions Answered
- Can I make these cupcakes ahead of time? Absolutely! You can bake the cupcakes and make the buttercream a day in advance. Store them separately and assemble the cupcakes just before serving.
- Can I freeze these cupcakes? Yes, you can freeze the cupcakes, but I recommend freezing them unfrosted. Wrap them tightly in plastic wrap and then place them in a freezer-safe bag or container. Thaw them completely before frosting.
- Can I use a different type of frosting? Of course! Cream cheese frosting or chocolate ganache would also be delicious.
- Where can I find candy melts? Candy melts are available at most craft stores and some grocery stores.
- Can I use regular chocolate instead of candy melts? Yes, but you’ll need to temper the chocolate to prevent it from blooming (developing a white coating).
Serving Suggestions: Make a Statement
These cute chick cupcakes are perfect for Easter brunch, spring parties, or any occasion that calls for a touch of sweetness and whimsy. Arrange them on a pretty platter or display them on a cupcake stand for a stunning presentation. Pair them with a glass of milk, iced tea, or sparkling wine for the ultimate treat. You can even package them up as adorable party favors. The possibilities are endless!
So there you have it, my friends! Your foolproof guide to creating the cutest Easter chick cupcakes on the block. Get baking, get creative, and get ready to impress. Until next time, happy baking! And remember, life’s too short for boring desserts. 🥂
Loved this recipe? Save it to your favorite Pinterest board so you can easily find it later! ✨