Cardamom Creme Brulee Tarts with Roasted Rhubarb: A Spring Dessert Sensation
Okay, listen up, dessert devotees! Julian here, your guide to ridiculously impressive food with minimal effort. Forget slaving away in the kitchen; we’re about to conquer spring with these Cardamom Creme Brulee Tarts with Roasted Rhubarb. Trust me, these aren’t your grandma’s tarts (unless your grandma is secretly a Michelin-star chef with a penchant for shortcuts). They’re sophisticated, delicious, and, dare I say, insanely easy thanks to a few clever tricks. Prepare to be showered with compliments! This is the ultimate hack for wowing your guests without breaking a sweat. 🥂
Why You’ll Love This Rhubarb Creme Brulee Tart Recipe
Seriously, what’s not to love? These tarts are a symphony of flavors and textures. The delicate cardamom-infused creme brûlée filling, the sweet-tart roasted rhubarb, and the buttery buckwheat pastry create a dessert experience that’s both elegant and comforting. But the *real* reason you’ll love them? They look like you spent hours on them, but they’re secretly a breeze to make. Think of the time you’ll save! This is a total game-changer for spring entertaining, and it’s a guaranteed crowd-pleaser. You can even make elements of the recipe ahead of time, making it even easier to pull off when you have guests. It’s an absolute winner!
- **Flavor explosion**: The combination of cardamom, vanilla, and rhubarb is simply divine.
- **Impressive presentation**: These tarts look like they came straight from a fancy patisserie.
- **Time-saving**: Clever shortcuts make this recipe surprisingly easy.
- **Make-ahead friendly**: Components can be prepared in advance for ultimate convenience.
Ingredients: Your Secret Weapons
Here’s what you’ll need to whip up these little beauties. Don’t skimp on quality; it makes all the difference! Remember, we’re all about maximum impact with minimum effort. We’re using good ingredients to do the heavy lifting for us!
- **Buckwheat Pastry**
- 220g buckwheat flour
- 30g caster sugar
- Pinch of salt
- 125g unsalted butter, diced and chilled
- 1 large egg yolk
- **Cardamom Creme Brûlée**
- 1/2 vanilla pod or 1 tsp vanilla bean paste
- 1tsp ground cardamon
- 500ml double cream
- 6 large egg yolks
- 45g caster sugar, plus extra for brûlée topping
- **Roasted Rhubarb**
- 1 batch roasted rhubarb (recipe here)
- 3 tbsp roughly chopped pistachios
Step-by-Step: Let’s Get Baking!
Alright, let’s break down the process. Don’t be intimidated; it’s much easier than it looks. We’re going to walk through each element, step by step, so you can make this recipe with confidence.
- **Creme Brûlée Filling:** To make *the creme* brûlée filling, scrape the seeds *from the* vanilla pod and *place* them *into a bowl* along with *the* cardamon, egg yolks and sugar, whisking together.
- *Place the* cream *into a* pan and bring to a simmer.
- Pour *the* cream *onto the* egg *mixture* and whisk *to combine*.
- *Place the bowl* over a pan of gently simmering water and stir constantly with a whisk (don’t whisk vigorously, just stir gently, regularly scraping the bottom *of the bowl*) *for about* 10-15 *minutes or until the custard* has thickened; *the mixture* should be *the texture of a thick pouring custard*.
- *Remove the bowl from the* pan and press a sheet of clingfilm *onto the* surface *of the custard and refrigerate* overnight.
- **Buckwheat Pastry:** To make *the pastry*, *place the* flour, sugar and salt *into the bowl of a* food processor and pulse *to combine*.
- Add *the* butter and pulse *until the mixture* resembles fine breadcrumbs.
- Add *the* egg yolk to *the* processor and pulse *to combine*.
- Squeeze some *of the mixture* together and if it holds its shape it is ready but if it crumbles apart pulse *in a little* water, a teaspoon at time *until the dough* holds together (normally it takes *for about* 1-2 tbsp to bring *the pastry* together).
- Tip *the dough* out *onto the* work surface and bring together with your hands, forming *into a* short, fat beef sausage shape.
- Wrap *the dough* in clingfilm *and refrigerate for* at least *an hour* before using.
- Preheat *the* oven to 180C (160C fan) and line a baking tray with parchment paper.
- To form *the tart shells* *remove the pastry from the fridge* and cut *into* six discs.
- Roll each disc *of pastry* between parchment paper *until about* 2-3mm thick.
- Gently drape *the pastry into a* 10cm loose bottomed fluted tartlet tin, pressing *into the* corners.
- Trim off *the* excess and *place onto the* baking tray.
- Repeat with *the* remaining *pastry and refrigerate for an hour or until* firm.
- Line *the tart shells* with a piece of crumpled parchment paper and fill with baking beans or rice and bake in the preheated oven *for* 25 minutes.
- *Remove the* parchment and *the* baking beans and bake *the tarts for a* further 5-10 *minutes or until* golden brown.
- Set aside to cool.
- Once *the pastry* has cooled *remove the creme* brûlée filling *from the fridge* and divide between *the tart shells*.
- Top *the tarts* with a even layer *of* caster sugar and using a kitchen blowtorch caramelise *the* sugar.
- *Place the tarts into the fridge for about an hour* before serving (any longer and *the* crisp layer *of* sugar will start to melt).
- Preheat *the* oven to 190C (180C fan).
- Whilst *the tarts* are chilling roast *the* rhubarb as *in* this recipe here.
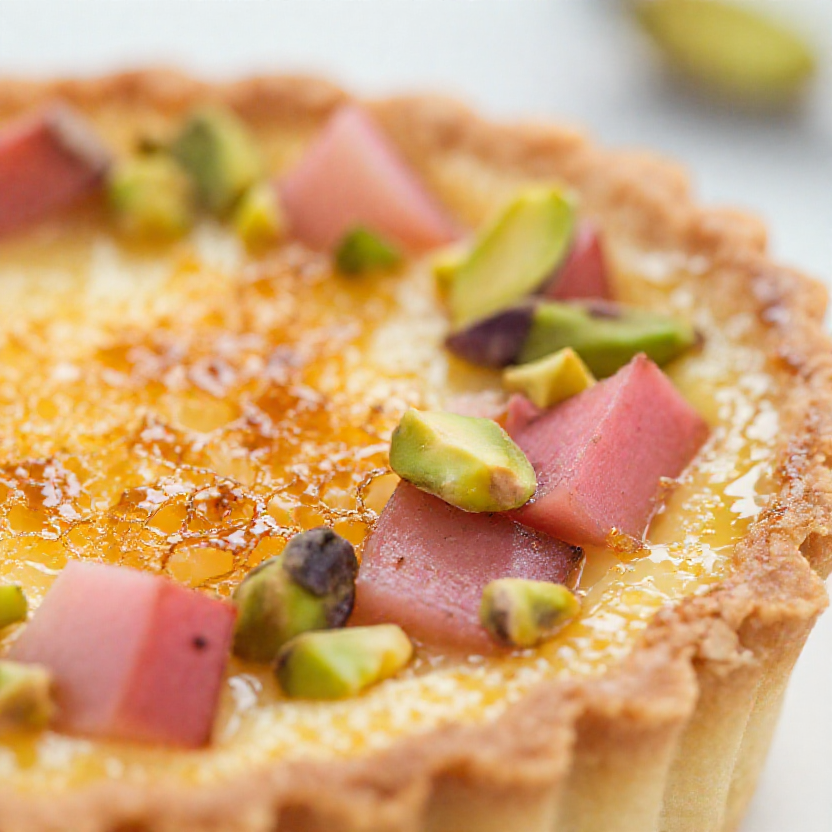
- To serve top each tart with a few pieces *of the* rhubarb, with *a little of the* syrup, and a sprinkling *of* pistachios.
Pro Tips: The Secret Sauce to Tart Perfection
Okay, here’s where I let you in on some insider secrets. These tips will take your tarts from good to *gorgeous*. Consider them your cheat codes for baking success!
- **Chill Out:** Chilling the pastry dough is crucial for preventing shrinkage during baking. Don’t skip this step!
- **Blind Baking is Key:** Blind baking *the tart shells* ensures a crisp, even base. Nobody wants a soggy bottom!
- **Gentle Custard:** When making *the custard*, don’t over-whisk. Gentle stirring prevents air bubbles and ensures a smooth *creme filling*.
- **Blowtorch Like a Pro:** Keep the blowtorch moving to avoid burning the sugar. Aim for a deep golden-brown color.
- **Rhubarb Roasting:** Roasting *the* rhubarb brings out its natural sweetness and creates a beautiful, jammy texture.
Common Mistakes (and How to Avoid Them!)
Even the best bakers make mistakes. Here’s how to sidestep some common pitfalls and guarantee a flawless final product.
- **Soggy Pastry:** Make sure your butter is cold and don’t overwork *the dough*. Blind baking is your best friend!
- **Cracked Creme Brûlée:** Overcooking *the custard* can cause it to crack. Cook it gently over low heat and keep a close eye on it.
- **Burnt Sugar:** Keep the blowtorch moving and don’t hold it too close to *the* sugar. Patience is key!
- **Melting Sugar Topping:** Brûlée *the tarts* just before serving to prevent the sugar from melting.
Variations: Customize Your Tarts!
Want to put your own spin on these tarts? Here are a few ideas to get your creative juices flowing.
- **Berry Blast:** Swap *the* rhubarb for mixed berries for a summery twist.
- **Citrus Zing:** Add lemon or orange zest to *the creme* brûlée filling for a bright, citrusy flavor.
- **Chocolate Decadence:** Drizzle *the tarts* with melted chocolate for an extra-indulgent treat.
- **Nutty Delight:** Use different nuts (like almonds or pecans) instead of pistachios for a unique flavor profile.
Storage: Keeping Your Tarts Fresh
These tarts are best enjoyed fresh, but here’s how to store them if you have leftovers (doubtful!).
- **Un-brûléed Tarts:** Store *the* un-brûléed tarts in *the fridge* for up to 2 days. Brûlée just before serving.
- **Brûléed Tarts:** Brûléed tarts are best eaten immediately. The sugar topping will soften over time.
- **Pastry Dough:** *The pastry dough* can be made ahead and stored *and refrigerate* for up to 3 days or frozen for up to a month.
FAQ: Your Burning Tart Questions Answered
Got questions? I’ve got answers! Here are some common queries about making these Cardamom Creme Brulee Tarts.
- **Can I use store-bought pastry?** Yes, you can! But homemade buckwheat pastry adds a lovely nutty flavor. Use a high-quality, all-butter pastry for best results.
- **Can I make *the creme* brûlée filling ahead of time?** Absolutely! In fact, it’s recommended. *The creme* brûlée needs to chill overnight to set properly.
- **Do I need a blowtorch?** A blowtorch is the easiest way to caramelize *the* sugar, but you can also use your oven’s broiler. Watch it carefully to prevent burning!
- **Can I freeze *the tarts*?** Freezing brûléed tarts is not recommended, as the sugar topping will become soggy. However, you can freeze un-brûléed tarts.
Serving Suggestions: The Grand Finale
These tarts are perfect for a spring brunch, afternoon tea, or elegant dinner party. Here are a few ideas for serving them with style.
- **With a dollop of whipped cream:** A classic pairing that never disappoints.
- **With a scoop of vanilla ice cream:** For an extra-indulgent treat.
- **With a glass of dessert wine:** A sweet wine like Sauternes or Moscato d’Asti complements the flavors of the tarts beautifully.
- **With a cup of coffee or tea:** A perfect ending to any meal.
So, there you have it! Cardamom Creme Brulee Tarts with Roasted Rhubarb: a dessert that’s both impressive and insanely easy. Now go forth and conquer your kitchen! You’ve got this. 🥂