
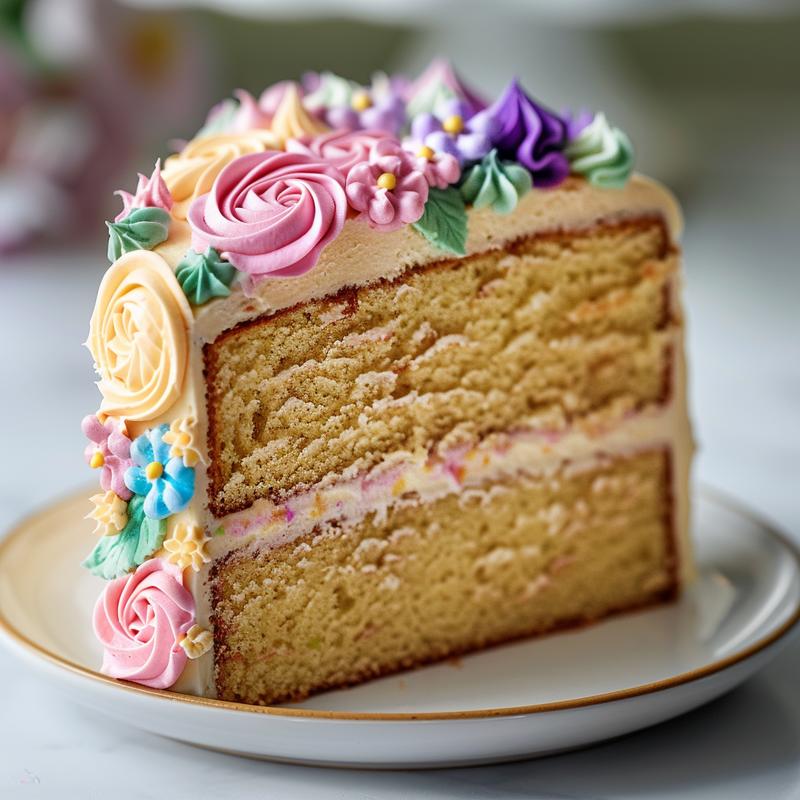
Hello, sweet friends. There’s a certain magic that fills the air as spring arrives, a gentle awakening of colors and scents that inspires a sense of renewal. Today, I want to share a recipe that captures that very essence: a Whimsical Spring Cake adorned with delicate buttercream flowers. This isn’t just about baking a cake; it’s about creating a moment, a beautiful, edible expression of the season’s joy.
This cake decorating tutorial is a journey into the heart of spring baking, where every swirl of buttercream and every delicate petal whispers of new beginnings. So, let’s gather our ingredients, embrace the spirit of creativity, and embark on this soulful baking adventure together.
Why You’ll Love This Spring Cake
This cake isn’t just delicious; it’s a feast for the eyes and a balm for the soul. Here’s why you’ll find yourself falling in love with this whimsical creation:
- A Visual Masterpiece: The delicate buttercream flowers transform a simple cake into a stunning centerpiece, perfect for spring celebrations or a simple afternoon tea.
- Therapeutic Baking: The process of piping buttercream flowers is meditative and calming, allowing you to lose yourself in the art of cake decorating.
- Customizable Colors: You can tailor the colors of the buttercream to match your favorite spring blooms, making each cake a unique work of art.
- Deliciously Simple: Using a cake mix as a base makes this recipe approachable for bakers of all skill levels, allowing you to focus on the joy of decorating.
- Perfect for Sharing: This cake is a beautiful way to share the joy of spring with friends and family, creating lasting memories with every slice.
Ingredients: Your Palette of Spring
Here’s what you’ll need to bring this whimsical vision to life:
- Cake: 1 box of vanilla cake mix + ingredients listed on the box (usually eggs, oil, water)
- Buttercream Frosting: 1 cup (2 sticks) unsalted butter, softened; 4 cups powdered sugar; 1/2 cup milk; 1 tsp vanilla extract
- Gel Food Coloring: Pink, Purple, Yellow, Green
- Piping Bags: 3-4
- Piping Tips: Wilton 104 (rose tip), Wilton 352 (leaf tip), Wilton 12 (round tip)
- Sprinkles: Optional, for extra whimsy
Step-by-Step: A Symphony of Buttercream
Follow these steps to create your own whimsical spring cake:
- Bake the Cake: Prepare the cake mix according to the box directions. Bake in two 8-inch round cake pans. Let them cool completely.
- Make Buttercream: Beat the softened butter until it’s light and fluffy. Gradually add the powdered sugar, alternating with the milk, until you achieve a smooth consistency. Stir in the vanilla extract.
- Divide and Color Frosting: Divide the buttercream into 4 bowls. Tint each bowl with a different color (pink, purple, yellow, green) using gel food coloring. Remember, a little goes a long way!
- Prepare Piping Bags: Fill the piping bags with the colored buttercream. Use Wilton 104 for roses, Wilton 352 for leaves, and Wilton 12 for small dots/accents.
- Frost the Cake: Level the cake layers if needed. Place one layer on a serving plate or cake stand. Frost the top with a thin layer of white buttercream (reserve some white buttercream for touch-ups if needed). Place the second layer on top and frost the entire cake with a thin ‘crumb coat’ of white buttercream. Chill for 30 minutes.
- Pipe Buttercream Flowers: This is where the magic happens. Pipe roses, leaves, and dots onto the chilled cake. Start with larger flowers and fill in with smaller details. Don’t be afraid to experiment and let your creativity flow!
- Add Sprinkles (Optional): Sprinkle with your favorite spring-themed sprinkles for an extra touch of whimsy.
- Chill and Serve: Chill the cake for at least 30 minutes before serving to allow the buttercream to set.
Pro Tips for Buttercream Bliss
Here are a few little secrets to ensure your spring cake is a resounding success:
- Softened Butter is Key: Ensure your butter is properly softened for a smooth and creamy buttercream.
- Gel Food Coloring: Gel food coloring provides vibrant colors without altering the consistency of the buttercream.
- Chill Time is Crucial: Chilling the cake and buttercream helps the flowers hold their shape.
- Practice Piping: Practice piping your flowers on a piece of parchment paper before decorating the cake.
- Embrace Imperfection: Remember, each flower is unique, just like in nature. Don’t strive for perfection; embrace the beauty of imperfection.
Common Mistakes and How to Avoid Them
Even experienced bakers encounter bumps along the way. Here’s how to navigate common pitfalls:
- Buttercream Too Soft: If your buttercream is too soft, chill it in the refrigerator for a few minutes to firm it up.
- Flowers Losing Shape: Ensure your cake is properly chilled before piping the flowers.
- Uneven Cake Layers: Level your cake layers with a serrated knife for a more professional finish.
- Overmixing Buttercream: Overmixing can incorporate too much air, resulting in a buttercream that is less stable. Mix until just combined.
- Rushing the Process: Take your time and enjoy the process of decorating. Rushing can lead to mistakes.
Variations: A Canvas for Creativity
This recipe is a starting point, a canvas for your own creativity. Here are a few variations to inspire you:
- Different Cake Flavors: Experiment with different cake flavors, such as lemon, almond, or coconut.
- Ombre Buttercream: Create an ombre effect by gradually lightening or darkening the buttercream color as you pipe.
- Edible Flowers: Incorporate edible flowers for an extra touch of natural beauty.
- Chocolate Drip: Add a chocolate drip for a more decadent touch.
- Fruit Filling: Add a layer of fresh fruit filling between the cake layers.
Storage: Preserving the Beauty
To keep your whimsical spring cake fresh and beautiful:
- Refrigerate: Store the cake in the refrigerator for up to 3-4 days.
- Cover Properly: Cover the cake loosely with plastic wrap or store it in an airtight container to prevent it from drying out.
- Bring to Room Temperature: Before serving, allow the cake to sit at room temperature for about 30 minutes to soften the buttercream.
Frequently Asked Questions (FAQ)
Here are some common questions about this recipe:
- Can I use store-bought buttercream? Yes, you can. However, homemade buttercream provides the best flavor and texture.
- Can I make the cake ahead of time? Yes, you can bake the cake layers a day ahead of time and store them in the refrigerator, wrapped in plastic wrap.
- Can I freeze the cake? Yes, you can freeze the undecorated cake layers for up to 2 months. Wrap them tightly in plastic wrap and then in foil.
- What if I don’t have all the piping tips? You can still create beautiful flowers with just a few basic tips. Experiment and see what you can create!
- How do I prevent my buttercream from melting? Keep the cake chilled and avoid placing it in direct sunlight or warm environments.
Serving Suggestions: Sharing the Joy
This cake is best served with:
- A cup of tea or coffee: The perfect accompaniment to a slice of spring cake.
- Fresh berries: A bowl of fresh berries adds a touch of natural sweetness and complements the floral flavors.
- A scoop of vanilla ice cream: A classic pairing that never disappoints.
- Good company: Share this cake with friends and family to create lasting memories.
Baking is more than just following a recipe; it’s about creating a moment, a memory, a connection. I hope this Whimsical Spring Cake brings a little bit of that magic into your kitchen and your heart. Happy baking, my friends!
Many customers find this recipe easy to follow, with one mentioning it’s a great way to get into cake decorating. To smooth the buttercream, customers find the fondant smoother incredibly helpful; you can read more about these tools online. The fondant smoother works well for achieving a professional finish. More customers find the results beautiful, and with one mentioning it’s the best spring cake they’ve ever made. Read more customers’ testimonials to see how this cake has brought joy to their celebrations. You can use this recipe for unique birthday cakes. Find the joy in spring baking!

How to Create a Whimsical Spring Cake with Delicate Buttercream Flowers
Ingredients
Method
- Bake the Cake: Prepare cake mix according to box directions. Bake in two 8-inch round cake pans. Let cool completely.
- Make Buttercream: Beat softened butter until light and fluffy. Gradually add powdered sugar, alternating with milk, until smooth. Stir in vanilla extract.
- Divide and Color Frosting: Divide buttercream into 4 bowls. Tint each bowl with a different color (pink, purple, yellow, green) using gel food coloring.
- Prepare Piping Bags: Fill piping bags with colored buttercream. Use Wilton 104 for roses, Wilton 352 for leaves, and Wilton 12 for small dots/accents.
- Frost the Cake: Level cake layers if needed. Place one layer on a serving plate or cake stand. Frost the top with a thin layer of white buttercream. Place the second layer on top and frost the entire cake with a thin 'crumb coat' of white buttercream. Chill for 30 minutes.
- Pipe Buttercream Flowers: Pipe roses, leaves, and dots onto the chilled cake. Start with larger flowers and fill in with smaller details.
- Add Sprinkles (Optional): Sprinkle with your favorite spring-themed sprinkles.
- Chill and Serve: Chill the cake for at least 30 minutes before serving to allow the buttercream to set.
Notes
Loved this recipe? Save it to your favorite Pinterest board so you can easily find it later! ✨
